Introduction

Flask Tutorial

Flask is a web application framework written in Python. Armin Ronacher, who leads an international group of Python enthusiasts named Pocco, develops it. Flask is based on Werkzeug WSGI toolkit and Jinja2 template engine. Both are Pocco projects.

Audience

This tutorial has been prepared for anyone who has a basic knowledge of Python and has an urge to develop websites. After completing this tutorial, you will find yourself at a moderate level of expertise in developing websites using Flask.

Prerequisites

Before you start proceeding with this tutorial, we are assuming that you have hands-on experience on HTML and Python. If you are not well aware of these concepts, then we will suggest you to go through our short tutorials on HTML and Python.

Overview

What is Web Framework?

Web Application Framework or simply Web Framework represents a collection of libraries and modules that enables a web application developer to write applications without having to bother about low-level details such as protocols, thread management etc.

What is Flask?

Flask is a web application framework written in Python. It is developed by Armin Ronacher, who leads an international group of Python enthusiasts named Pocco. Flask is based on the Werkzeug WSGI toolkit and Jinja2 template engine. Both are Pocco projects.

WSGI

Web Server Gateway Interface (WSGI) has been adopted as a standard for Python web application development. WSGI is a specification for a universal interface between the web server and the web applications.

Werkzeug

It is a WSGI toolkit, which implements requests, response objects, and other utility functions. This enables building a web framework on top of it. The Flask framework uses Werkzeug as one of its bases.

Jinga2

Jinga2 is a popular templating engine for Python. A web templating system combines a template with a certain data source to render dynamic web pages.

Flask is often referred to as a micro framework. It aims to keep the core of an application simple yet extensible. Flask does not have built-in abstraction layer for database handling, nor does it have form a validation support. Instead, Flask supports the extensions to add such functionality to the application. Some of the popular Flask extensions are discussed later in the tutorial.

Environment

Prerequisite

Python 2.6 or higher is usually required for installation of Flask. Although Flask and its dependencies work well with Python 3 (Python 3.3 onwards), many Flask extensions do not support it properly. Hence, it is recommended that Flask should be installed on Python 2.7.

Install virtualenv for development environment

virtualenv is a virtual Python environment builder. It helps a user to create multiple Python environments side-by-side. Thereby, it can avoid compatibility issues between the different versions of the libraries.

The following command installs virtualenv:

pip install virtualenv

This command needs administrator privileges. Add sudo before pip on Linux/Mac OS. If you are on Windows, log in as Administrator. On Ubuntu virtualenv may be installed using its package manager.

sudo apt-get install virtualenv

Once installed, new virtual environment is created in a folder.

mkdir newproj cd newproj virtualenv venv

To activate corresponding environment, on Linux/OS X, use the following:

venv/bin/activate

On Windows, following can be used:

venv\scripts\activate

We are now ready to install Flask in this environment.

pip install Flask

The above command can be run directly, without virtual environment for system-wide installation.

Application

In order to test Flask installation, type the following code in the editor as Hello.py

] from flask import Flask app = Flask(__name__) @app.route('/') def hello_world(): return 'Hello World’ if __name__ == '__main__': app.run()

Importing flask module in the project is mandatory. An object of Flask class is our WSGI application.

Flask constructor takes the name of current module (__name__) as argument.

The route() function of the Flask class is a decorator, which tells the application which URL should call the associated function.

app.route(rule, options)
  • The rule parameter represents URL binding with the function.
  • The options is a list of parameters to be forwarded to the underlying Rule object.

In the above example, ‘/’ URL is bound with hello_world() function. Hence, when the home page of web server is opened in browser, the output of this function will be rendered.

Finally the run() method of Flask class runs the application on the local development server.

app.run(host, port, debug, options)

All parameters are optional

Sr.No. Parameters & Description
1 host

Hostname to listen on. Defaults to 127.0.0.1 (localhost). Set to ‘0.0.0.0’ to have server available externally

2 port

Defaults to 5000

3 debug

Defaults to false. If set to true, provides a debug information

4 options

To be forwarded to underlying Werkzeug server.

The above given Python script is executed from Python shell.

Python Hello.py

A message in Python shell informs you that

* Running on http://127.0.0.1:5000/ (Press CTRL+C to quit)

Open the above URL (localhost:5000) in the browser. ‘Hello World’ message will be displayed on it.

Debug mode

A Flask application is started by calling the run() method. However, while the application is under development, it should be restarted manually for each change in the code. To avoid this inconvenience, enable debug support. The server will then reload itself if the code changes. It will also provide a useful debugger to track the errors if any, in the application.

The Debug mode is enabled by setting the debug property of the application object to True before running or passing the debug parameter to the run() method.

app.debug = True app.run() app.run(debug = True)
Routing

Modern web frameworks use the routing technique to help a user remember application URLs. It is useful to access the desired page directly without having to navigate from the home page.

The route() decorator in Flask is used to bind URL to a function. For example:

@app.route(‘/hello’) def hello_world(): return ‘hello world’

Here, URL ‘/hello’ rule is bound to the hello_world() function. As a result, if a user visits http://localhost:5000/hello URL, the output of the hello_world() function will be rendered in the browser.

The add_url_rule() function of an application object is also available to bind a URL with a function as in the above example, route() is used.

A decorator’s purpose is also served by the following representation:

def hello_world(): return ‘hello world’ app.add_url_rule(‘/’, ‘hello’, hello_world)
Variable Rules

It is possible to build a URL dynamically, by adding variable parts to the rule parameter. This variable part is marked as <variable-name> . It is passed as a keyword argument to the function with which the rule is associated.

In the following example, the rule parameter of route() decorator contains <name> variable part attached to URL ‘/hello’. Hence, if the http://localhost:5000/hello/TutorialsPoint is entered as a URL in the browser, ‘TutorialPoint’ will be supplied to hello() function as argument.

from flask import Flask app = Flask(__name__) @app.route('/hello/<name>') def hello_name(name): return 'Hello %s!' % name if __name__ == '__main__': app.run(debug = True)

Save the above script as hello.py and run it from Python shell. Next, open the browser and enter URL http://localhost:5000/hello/TutorialsPoint.

The following output will be displayed in the browser.

Hello TutorialsPoint!

In addition to the default string variable part, rules can be constructed using the following converters:

Sr.No. Converters & Description
1 int

Accepts integer

2 float

For floating point value

3 path

Accepts slashes used as directory separator character

In the following code, all these constructors are used.

from flask import Flask app = Flask(__name__) @app.route('/blog/') def show_blog(postID): return 'Blog Number %d' % postID @app.route('/rev/') def revision(revNo): return 'Revision Number %f' % revNo if __name__ == '__main__': app.run()

Run the above code from Python Shell. Visit the URL http://localhost:5000/blog/11 in the browser.

The given number is used as argument to the show_blog() function. The browser displays the following output:

Blog Number 11

Enter this URL in the browser − http://localhost:5000/rev/1.1

The revision() function takes up the floating point number as argument. The following result appears in the browser window:

Revision Number 1.100000

The URL rules of Flask are based on Werkzeug’s routing module. This ensures that the URLs formed are unique and based on precedents laid down by Apache.

Consider the rules defined in the following script:

from flask import Flask app = Flask(__name__) @app.route('/flask') def hello_flask(): return 'Hello Flask' @app.route('/python/') def hello_python(): return 'Hello Python' if __name__ == '__main__': app.run()

Both the rules appear similar but in the second rule, trailing slash (/) is used. As a result, it becomes a canonical URL. Hence, using /python or /python/ returns the same output. However, in case of the first rule, /flask/ URL results in 404 Not Found page.

URL Building

The url_for() function is very useful for dynamically building a URL for a specific function. The function accepts the name of a function as first argument, and one or more keyword arguments, each corresponding to the variable part of URL.

The following script demonstrates use of url_for() function.

from flask import Flask, redirect, url_for app = Flask(__name__) @app.route('/admin') def hello_admin(): return 'Hello Admin' @app.route('/guest/<guest>') def hello_guest(guest): return 'Hello %s as Guest' % guest @app.route('/user/<name>') def hello_user(name): if name =='admin': return redirect(url_for('hello_admin')) else: return redirect(url_for('hello_guest',guest = name)) if __name__ == '__main__': app.run(debug = True)

The above script has a function user(name) which accepts a value to its argument from the URL.

The User() function checks if an argument received matches ‘admin’ or not. If it matches, the application is redirected to the hello_admin() function using url_for(), otherwise to the hello_guest() function passing the received argument as guest parameter to it.

Save the above code and run from Python shell.

Open the browser and enter URL as − http://localhost:5000/user/admin

The application response in browser is:

Hello Admin

Enter the following URL in the browser − http://localhost:5000/user/mvl

The application response now changes to:

Hello mvl as Guest
HTTP Methods

Http protocol is the foundation of data communication in world wide web. Different methods of data retrieval from specified URL are defined in this protocol.

The following table summarizes different http methods:

Sr.No. Methods & Description
1 GET

Sends data in unencrypted form to the server. Most common method.

2 HEAD

Same as GET, but without response body

3 POST

Used to send HTML form data to server. Data received by POST method is not cached by server.

4 PUT

Replaces all current representations of the target resource with the uploaded content.

5 DELETE

Removes all current representations of the target resource given by a URL

By default, the Flask route responds to the GET requests. However, this preference can be altered by providing methods argument to route() decorator.

In order to demonstrate the use of POST method in URL routing, first let us create an HTML form and use the POST method to send form data to a URL.

Save the following script as login.html

<html> <body> <form action = "http://localhost:5000/login" method = "post"> <p>Enter Name:</p> <p><input type = "text" name = "nm" /></p> <p><input type = "submit" value = "submit" /></p> </form> </body> </html>

Now enter the following script in Python shell.

from flask import Flask, redirect, url_for, request app = Flask(__name__) @app.route('/success/') def success(name): return 'welcome %s' % name @app.route('/login',methods = ['POST', 'GET']) def login(): if request.method == 'POST': user = request.form['nm'] return redirect(url_for('success',name = user)) else: user = request.args.get('nm') return redirect(url_for('success',name = user)) if __name__ == '__main__': app.run(debug = True)

After the development server starts running, open login.html in the browser, enter name in the text field and click Submit.

Form data is POSTed to the URL in action clause of form tag.

http://localhost/login is mapped to the login() function. Since the server has received data by POST method, value of ‘nm’ parameter obtained from the form data is obtained by:

user = request.form['nm']

It is passed to ‘/success’ URL as variable part. The browser displays a welcome message in the window.

Change the method parameter to GET’ in login.html and open it again in the browser. The data received on server is by the GET method. The value of ‘nm’ parameter is now obtained by:

User = request.args.get(‘nm’)

Here, args is dictionary object containing a list of pairs of form parameter and its corresponding value. The value corresponding to ‘nm’ parameter is passed on to ‘/success’ URL as before.

Templates

It is possible to return the output of a function bound to a certain URL in the form of HTML. For instance, in the following script, hello() function will render ‘Hello World’ with <h1> tag attached to it.

from flask import Flask app = Flask(__name__) @app.route('/') def index(): return '

'Hello World'

' if __name__ == '__main__': app.run(debug = True)

However, generating HTML content from Python code is cumbersome, especially when variable data and Python language elements like conditionals or loops need to be put. This would require frequent escaping from HTML.

This is where one can take advantage of Jinja2 template engine, on which Flask is based. Instead of returning hardcode HTML from the function, a HTML file can be rendered by the render_template() function.

from flask import Flask app = Flask(__name__) @app.route('/') def index(): return render_template(‘hello.html’) if __name__ == '__main__': app.run(debug = True)

Flask will try to find the HTML file in the templates folder, in the same folder in which this script is present.

  • Application folder
    • Hello.py
    • templates
      • hello.html

The term ‘web templating system’ refers to designing an HTML script in which the variable data can be inserted dynamically. A web template system comprises of a template engine, some kind of data source and a template processor.

Flask uses jinga2 template engine. A web template contains HTML syntax interspersed placeholders for variables and expressions (in these case Python expressions) which are replaced values when the template is rendered.

The following code is saved as hello.html in the templates folder.

<!doctype html> <html> <body> <h1>Hello {{ name }}!</h1> </body> </html>

Next, run the following script from Python shell.

from flask import Flask, render_template app = Flask(__name__) @app.route('/hello/<user>') def hello_name(user): return render_template('hello.html', name = user) if __name__ == '__main__': app.run(debug = True)

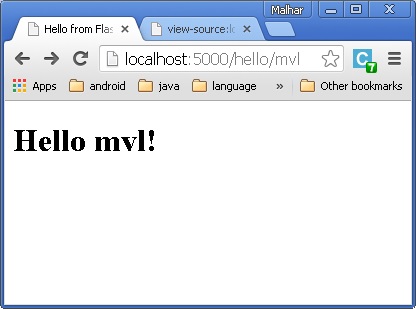
As the development server starts running, open the browser and enter URL as − http://localhost:5000/hello/mvl

The variable part of URL is inserted at {{ name }} place holder.

The Jinga2 template engine uses the following delimiters for escaping from HTML.

  • {% ... %} for Statements
  • {{ ... }} for Expressions to print to the template output
  • {# ... #} for Comments not included in the template output
  • # ... ## for Line Statements

In the following example, use of conditional statement in the template is demonstrated. The URL rule to the hello() function accepts the integer parameter. It is passed to the hello.html template. Inside it, the value of number received (marks) is compared (greater or less than 50) and accordingly HTML is conditionally rendered.

The Python Script is as follows:

from flask import Flask, render_template app = Flask(__name__) @app.route('/hello/<int:score>') def hello_name(score): return render_template('hello.html', marks = score) if __name__ == '__main__': app.run(debug = True)

HTML template script of hello.html is as follows:

<!doctype html> <html> <body> {% if marks>50 %} <h1> Your result is pass!</h1> {% else %} <h1>Your result is fail</h1> {% endif %} </body> </html>

Note that the conditional statements if-else and endif are enclosed in delimiter {%..%}.

Run the Python script and visit URL http://localhost/hello/60 and then http://localhost/hello/30 to see the output of HTML changing conditionally.

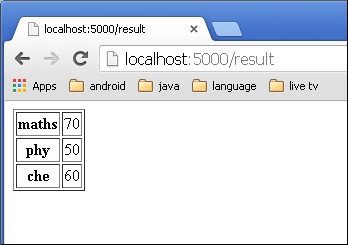
The Python loop constructs can also be employed inside the template. In the following script, the result() function sends a dictionary object to template results.html when URL http://localhost:5000/result is opened in the browser.

The Template part of result.html employs a for loop to render key and value pairs of dictionary object result{} as cells of an HTML table.

Run the following code from Python shell.

from flask import Flask, render_template app = Flask(__name__) @app.route('/result') def result(): dict = {'phy':50,'che':60,'maths':70} return render_template('result.html', result = dict) if __name__ == '__main__': app.run(debug = True)

Save the following HTML script as result.html in the templates folder.

<!doctype html> <html> <body> <table border = 1> {% for key, value in result.iteritems() %} <tr> <th> {{ key }} </th> <td> {{ value }} </td> </tr> {% endfor %} </table> </body> </html>

Here, again the Python statements corresponding to the For loop are enclosed in {%..%} whereas, the expressions key and value are put inside {{ }}.

After the development starts running, open http://localhost:5000/result in the browser to get the following output.

References